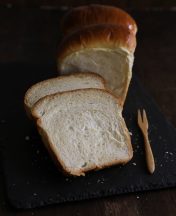
Soft Asian Milk Bread Hand Knead Method 牛奶麵包
Warning: Parameter 2 to wp_hide_post_Public::query_posts_join() expected to be a reference, value given in /home/yirese5/public_html/wp-includes/class-wp-hook.php on line 287

Years ago I posted an Asian Soft Milk Bread (aka Hokkaido Milk Bread) recipe where I introduced TangZhong (aka water roux), a slush made from liquid and flour, to make the bread incredibly light and flavorful.
That original recipe went on to become one of my most popular recipes on this site and for a moment I questioned myself if I should have been a baking blogger instead 🙂
You may call me obsessed, but I am willing to spend hours to make this bread because:
- The light and pillowy texture is nothing you can find in regular white bread
- The rich milk flavor in this bread makes me keep on eating
- I can’t find any bread quite like this anywhere near me

Anyway, since the original milk bread was posted, I have received a lot of kind comments as well as requests from readers from all over the world. One of the requests being for me to share a hand knead version of this milk bread.
So without further ado, let me share this very detailed recipe on how to make this super soft and fluffy Asian milk bread from start to finish without a stand mixer or bread machine.
If you’ve already made my original Asian milk bread, you know this bread is not for the faint-hearted.
In order to achieve that ultimate pillowy texture, I use a pretty aggressive but effective kneading technique to build as much gluten as I can. If you have a better kneading trick, please do share in the comment below.

It takes about 30 minutes from combing all the ingredients to finishing kneading the dough so it’s important to be mentally and physically ready for the heavy lifting.
New YouTube Video
To make this milk bread recipe as detailed and easy-to-follow as possible, I have created a YouTube video which you can follow the entire process from start to finish. The video is on the longer side (a little over 9 minutes) but I just couldn’t shorten it any further without losing critical details.
I’d suggest you use the video in conjunction with the printable recipe below to get the best results.
This recipe vs original recipe
This recipe uses the same ingredients as the original milk bread with a few small changes:
- I have replaced heavy cream with additional butter. Personally I don’t stock up cream in my fridge but I always have enough butter to make a few loaves so it’s easier to eliminate cream all together.
- I have been using instant yeast instead of active dry yeast in recent years. The difference between the two is that latter requires proofing (aka dissolving in warm water) while former can be used right away. There is a lot debate on which one is better but I just like the former because it’s more convenient.
- Not really a new addition but given the name of this bread, it should be obvious to use good quality whole milk. Skim or reduced milk does not really cut it.
- Lastly, in this new recipe I add a small portion of reserved dough from previous bread making to enhance the overall flavor and texture. It works sort of like a starter and I can definitely taste the difference. If you make bread at least twice a month, I suggest you save a golf ball size dough in the fridge each time you make the dough and add to the dough next time.

As always, please feel free to let me know in the comment area if you have any questions.
I would also love for you to chime in and let me know if you have a secret to make better bread.
Also, if you ever get to make a loaf of this soft milk bread, please share the picture with me using hash tag #yireservation.
Soft Asian Milk Bread Hand Knead Method
Yield: One 2lb Loaf
Prep Time: 45 mins
Cook Time: 35 mins
Total Time: 4 hours
Ingredients:
Main Dough:
- 330g / 2.5cup bread flour
- 110g / 1/2cup TangZhong (water roux) - See ingredients below
- 80ml / 1/3cup milk + 2tbsp
- 56g / 1/2stick butter (at room temperature)
- 50g / 1/4cup sugar
- *Reserved dough, about golf ball size
- 1 large egg, beaten, reserve 1 tbsp
- 3g / 1/2tsp salt
- 2g / 1tsp instant yeast
- 1tsp vanilla extract
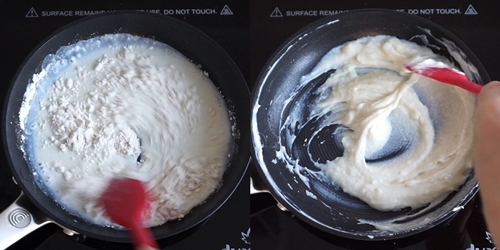
TangZhong (water roux):
- 100ml / 0.4cup water or milk (preferred)
- 20g /2tbsp + 1tsp AP flour
Directions:
 To make the main dough using a mixer or bread machine, please check my original milk bread recipe. Otherwise, combine the flour, sugar, salt, yeast in a mixing bowl. Then add TangZhong (water roux), egg, reserved dough, 2/3 of the milk, and vanilla extract (optional) to the dry ingredients.
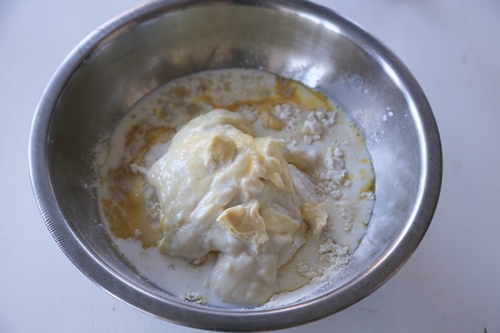 Mix by hand until all the ingredients are incorporated. That is when there is no more dry lumps of flour. Add some of the remaining milk if the mixture is too dry. Use your palm to press and the roll the ingredients until a ball is formed and not sticking to the side of the bowl. This might take 2-3 minutes. Add the rest of the milk to ensure the dough is soft.
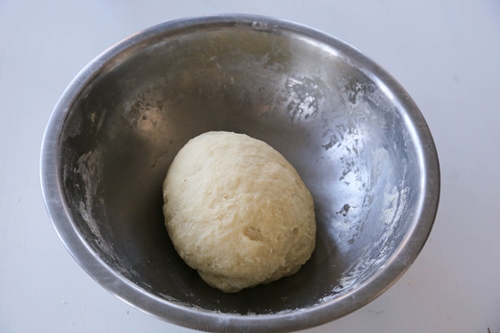 Transfer the dough ball to a work station. Flatten the dough and add the room temperature butter to the center of the dough. Fold the dough to enclose the butter. Incorporate the butter by pressing and pushing the dough. This step gets messy in the beginning but after a few minutes the butter will start to get absorbed by the dough. Keep on kneading until the working station is mostly free of butter.
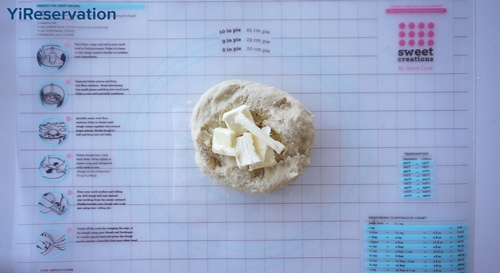 Continue to knead the dough to develop more gluten. The basic steps are: roll the dough into a oval shape with one end pointing to you. Hold one end of the dough by one hand and use the other hand to press and push forward the dough. When the dough is pushed apart, roll it back to form an oval with ends pointing to your left and right. Turn the dough by 90 degree and repeat the above process. To develop the fluffy texture, you’ll need to repeat this kneading process for 10 – 15 minutes so the dough can build more gluten.
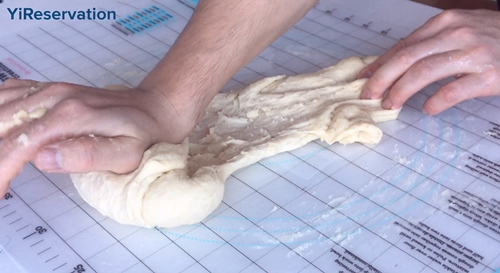 To test if your dough is ready, put the dough on your palm and stretch the dough by spreading your fingers wide. If the dough gets stretched without tearing apart, congratulations you are done with kneading. Save a golf ball size dough in the fridge for your next bread making.
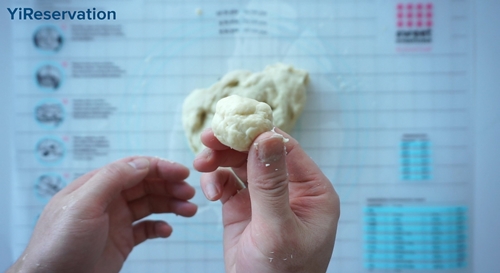 Next, you want to make your dough as smooth and shiny as possible so your bread will come out nice and smooth. To do that, gently rotate the dough using both of your palms until the surface is smooth. Then form the dough into a ball. Dust the mixing bowl with some flour and place the dough back in the mixing bowl. Cover it with plastic wrap and let it proof over 1-2 hours at room temperature (summer) or warm spot (winter) until it doubles in size.
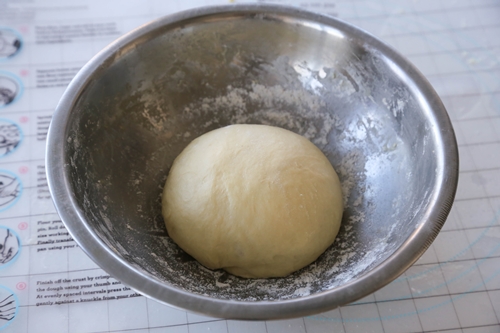 Once the dough doubles in size, transfer it back to the work station. Poke a hole in the center and shape it into a donut ring. Cut open the ring and divide into 3 equal portions.
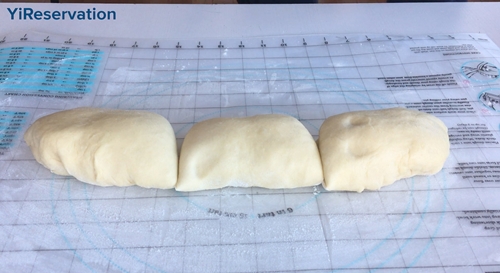 For each portion of dough, shape it into a ball. Dust the ball with some flour and then roll it between the work station and your palm to squeeze out trapped air and make it smooth. Cover and let the dough balls rest for 15 minutes.
 Once the dough is relaxed, dust each ball with some flour. Gently flatten each ball and roll it into a rectangular sheet with a rolling pin. Flip the sheet so the smooth side is facing down.
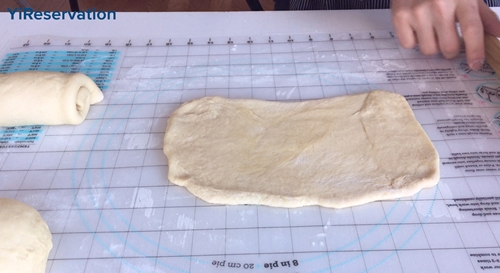 Fold the two opposite sides of the dough sheet towards the middle with some overlap. And roll it lengthwise into a roll. Repeat for each portion of the dough.
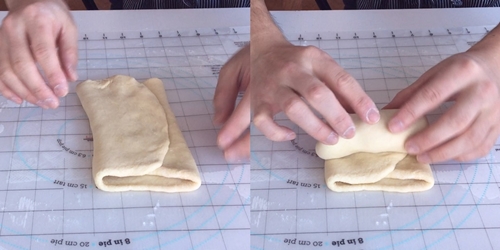 Cover the dough and let it rest for 15 minutes.
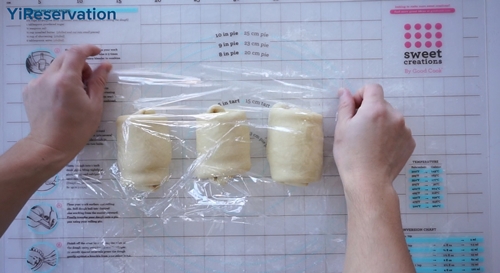 Once the dough is relaxed, roll out each dough again into a rectangular sheet. Flip it (or keep the smooth side on the facing the workstation) and fold sheet and roll into a roll just like the previous step.
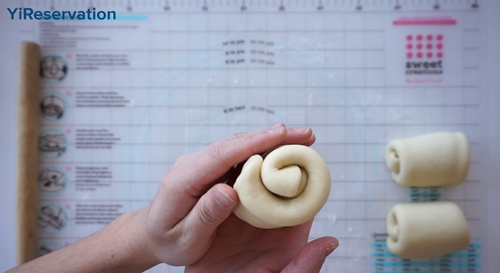 Line your loaf pan with parchment paper or use a fitted loaf pan liner. Place each log into your loaf pan. Cover with plastic wrap and let it proof for one last time until it almost doubles the size. About 1 – 1.5 hrs.
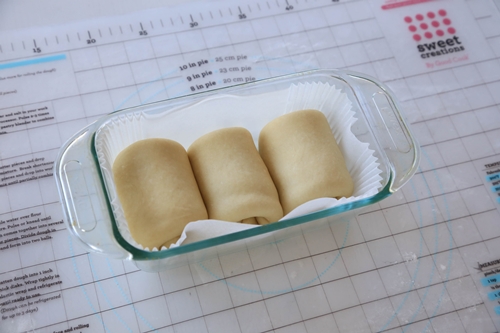 Pre-heat the oven to 375F or 190C for at least 30 minutes. Once the final proof is complete, brush the bread dough with reserved egg wash. Bake the bread uncovered for 20 minutes.
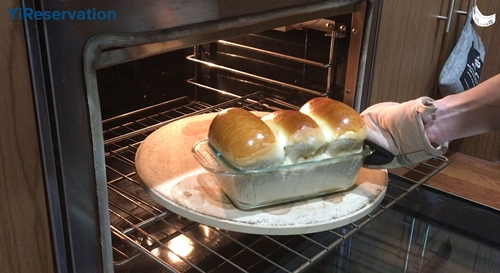
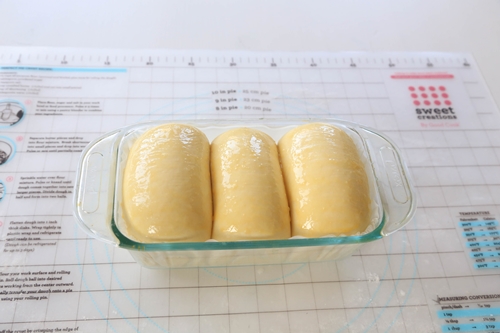 After 20 minutes, cover the bread with a piece of aluminum foil. Turn the oven down to 350F or 175C and bake for another 10 minutes. Turn off the oven and leave the bread in for 5 minutes before taking out. Transfer the bread to a cooling rack and let it cool to touch before serving.
 This bread can be stored in cool place for up to 3 days (only if it lasts that long)