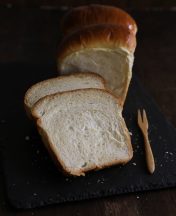
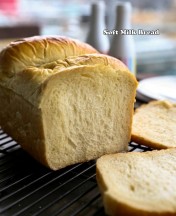
Soft Asian Milk Bread Hand Knead Method 牛奶麵包
Warning: Parameter 2 to wp_hide_post_Public::query_posts_join() expected to be a reference, value given in /home/yirese5/public_html/wp-includes/class-wp-hook.php on line 287

Years ago I posted an Asian Soft Milk Bread (aka Hokkaido Milk Bread) recipe where I introduced TangZhong (aka water roux), a slush made from liquid and flour, to make the bread incredibly light and flavorful.
That original recipe went on to become one of my most popular recipes on this site and for a moment I questioned myself if I should have been a baking blogger instead 🙂
You may call me obsessed, but I am willing to spend hours to make this bread because:
- The light and pillowy texture is nothing you can find in regular white bread
- The rich milk flavor in this bread makes me keep on eating
- I can’t find any bread quite like this anywhere near me

Anyway, since the original milk bread was posted, I have received a lot of kind comments as well as requests from readers from all over the world. One of the requests being for me to share a hand knead version of this milk bread.
So without further ado, let me share this very detailed recipe on how to make this super soft and fluffy Asian milk bread from start to finish without a stand mixer or bread machine.
If you’ve already made my original Asian milk bread, you know this bread is not for the faint-hearted.
In order to achieve that ultimate pillowy texture, I use a pretty aggressive but effective kneading technique to build as much gluten as I can. If you have a better kneading trick, please do share in the comment below.

It takes about 30 minutes from combing all the ingredients to finishing kneading the dough so it’s important to be mentally and physically ready for the heavy lifting.
New YouTube Video
To make this milk bread recipe as detailed and easy-to-follow as possible, I have created a YouTube video which you can follow the entire process from start to finish. The video is on the longer side (a little over 9 minutes) but I just couldn’t shorten it any further without losing critical details.
I’d suggest you use the video in conjunction with the printable recipe below to get the best results.
This recipe vs original recipe
This recipe uses the same ingredients as the original milk bread with a few small changes:
- I have replaced heavy cream with additional butter. Personally I don’t stock up cream in my fridge but I always have enough butter to make a few loaves so it’s easier to eliminate cream all together.
- I have been using instant yeast instead of active dry yeast in recent years. The difference between the two is that latter requires proofing (aka dissolving in warm water) while former can be used right away. There is a lot debate on which one is better but I just like the former because it’s more convenient.
- Not really a new addition but given the name of this bread, it should be obvious to use good quality whole milk. Skim or reduced milk does not really cut it.
- Lastly, in this new recipe I add a small portion of reserved dough from previous bread making to enhance the overall flavor and texture. It works sort of like a starter and I can definitely taste the difference. If you make bread at least twice a month, I suggest you save a golf ball size dough in the fridge each time you make the dough and add to the dough next time.

As always, please feel free to let me know in the comment area if you have any questions.
I would also love for you to chime in and let me know if you have a secret to make better bread.
Also, if you ever get to make a loaf of this soft milk bread, please share the picture with me using hash tag #yireservation.
Soft Asian Milk Bread Hand Knead Method
Yield: One 2lb Loaf
Prep Time: 45 mins
Cook Time: 35 mins
Total Time: 4 hours
Ingredients:
Main Dough:
- 330g / 2.5cup bread flour
- 110g / 1/2cup TangZhong (water roux) - See ingredients below
- 80ml / 1/3cup milk + 2tbsp
- 56g / 1/2stick butter (at room temperature)
- 50g / 1/4cup sugar
- *Reserved dough, about golf ball size
- 1 large egg, beaten, reserve 1 tbsp
- 3g / 1/2tsp salt
- 2g / 1tsp instant yeast
- 1tsp vanilla extract
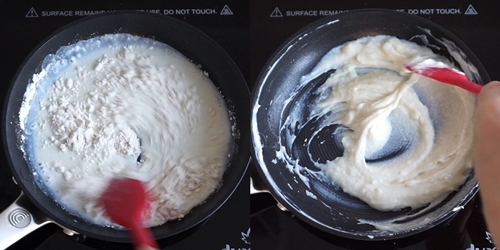
TangZhong (water roux):
- 100ml / 0.4cup water or milk (preferred)
- 20g /2tbsp + 1tsp AP flour
Directions:
 To make the main dough using a mixer or bread machine, please check my original milk bread recipe. Otherwise, combine the flour, sugar, salt, yeast in a mixing bowl. Then add TangZhong (water roux), egg, reserved dough, 2/3 of the milk, and vanilla extract (optional) to the dry ingredients.
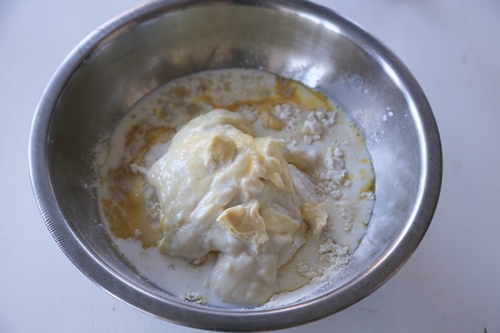 Mix by hand until all the ingredients are incorporated. That is when there is no more dry lumps of flour. Add some of the remaining milk if the mixture is too dry. Use your palm to press and the roll the ingredients until a ball is formed and not sticking to the side of the bowl. This might take 2-3 minutes. Add the rest of the milk to ensure the dough is soft.
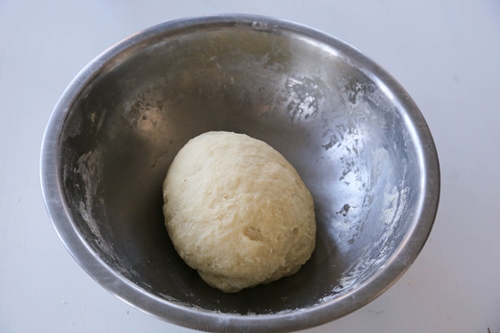 Transfer the dough ball to a work station. Flatten the dough and add the room temperature butter to the center of the dough. Fold the dough to enclose the butter. Incorporate the butter by pressing and pushing the dough. This step gets messy in the beginning but after a few minutes the butter will start to get absorbed by the dough. Keep on kneading until the working station is mostly free of butter.
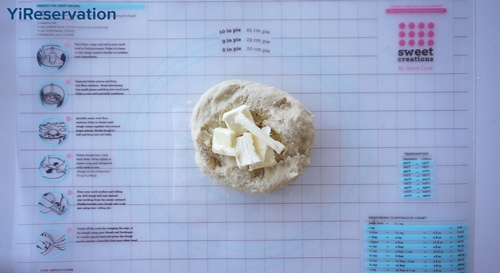 Continue to knead the dough to develop more gluten. The basic steps are: roll the dough into a oval shape with one end pointing to you. Hold one end of the dough by one hand and use the other hand to press and push forward the dough. When the dough is pushed apart, roll it back to form an oval with ends pointing to your left and right. Turn the dough by 90 degree and repeat the above process. To develop the fluffy texture, you’ll need to repeat this kneading process for 10 – 15 minutes so the dough can build more gluten.
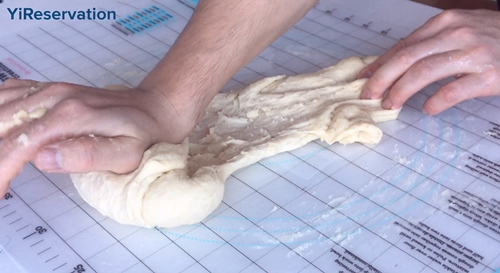 To test if your dough is ready, put the dough on your palm and stretch the dough by spreading your fingers wide. If the dough gets stretched without tearing apart, congratulations you are done with kneading. Save a golf ball size dough in the fridge for your next bread making.
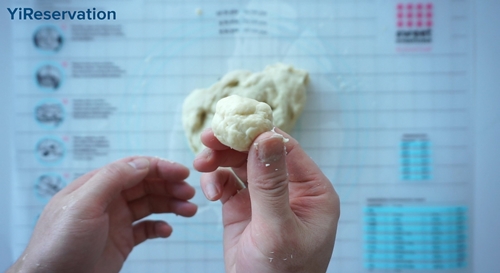 Next, you want to make your dough as smooth and shiny as possible so your bread will come out nice and smooth. To do that, gently rotate the dough using both of your palms until the surface is smooth. Then form the dough into a ball. Dust the mixing bowl with some flour and place the dough back in the mixing bowl. Cover it with plastic wrap and let it proof over 1-2 hours at room temperature (summer) or warm spot (winter) until it doubles in size.
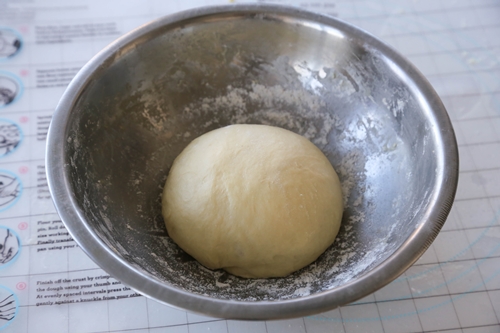 Once the dough doubles in size, transfer it back to the work station. Poke a hole in the center and shape it into a donut ring. Cut open the ring and divide into 3 equal portions.
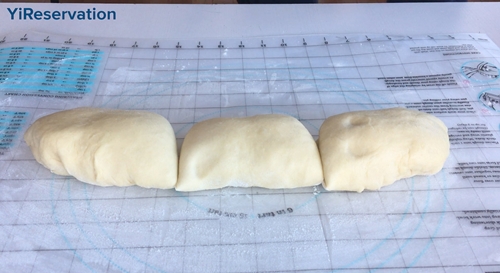 For each portion of dough, shape it into a ball. Dust the ball with some flour and then roll it between the work station and your palm to squeeze out trapped air and make it smooth. Cover and let the dough balls rest for 15 minutes.
 Once the dough is relaxed, dust each ball with some flour. Gently flatten each ball and roll it into a rectangular sheet with a rolling pin. Flip the sheet so the smooth side is facing down.
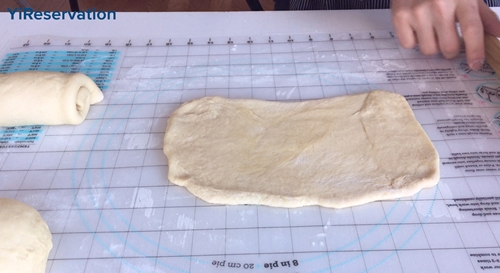 Fold the two opposite sides of the dough sheet towards the middle with some overlap. And roll it lengthwise into a roll. Repeat for each portion of the dough.
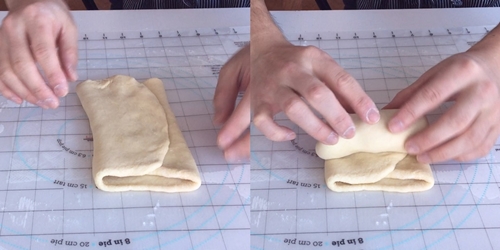 Cover the dough and let it rest for 15 minutes.
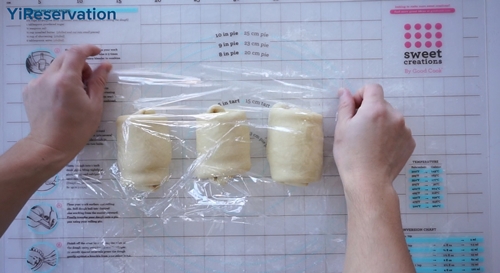 Once the dough is relaxed, roll out each dough again into a rectangular sheet. Flip it (or keep the smooth side on the facing the workstation) and fold sheet and roll into a roll just like the previous step.
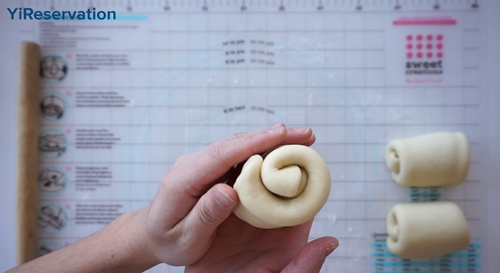 Line your loaf pan with parchment paper or use a fitted loaf pan liner. Place each log into your loaf pan. Cover with plastic wrap and let it proof for one last time until it almost doubles the size. About 1 – 1.5 hrs.
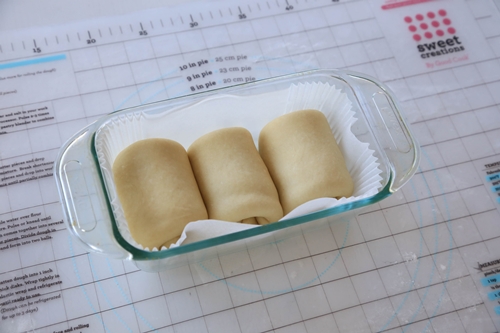 Pre-heat the oven to 375F or 190C for at least 30 minutes. Once the final proof is complete, brush the bread dough with reserved egg wash. Bake the bread uncovered for 20 minutes.
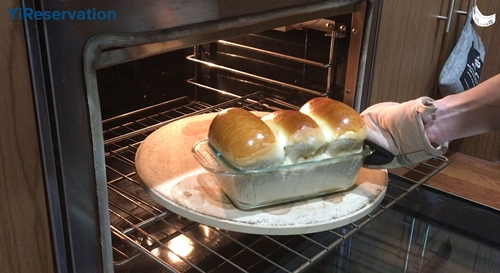
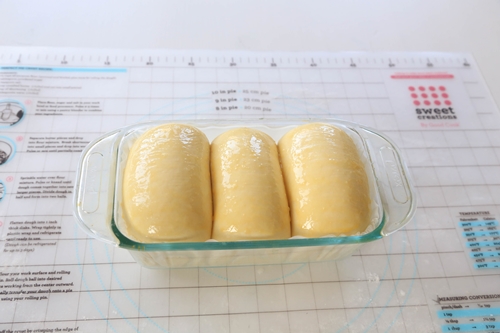 After 20 minutes, cover the bread with a piece of aluminum foil. Turn the oven down to 350F or 175C and bake for another 10 minutes. Turn off the oven and leave the bread in for 5 minutes before taking out. Transfer the bread to a cooling rack and let it cool to touch before serving.
 This bread can be stored in cool place for up to 3 days (only if it lasts that long)
Warning: Use of undefined constant rand - assumed 'rand' (this will throw an Error in a future version of PHP) in /home/yirese5/public_html/wp-content/themes/yireservation/single.php on line 72
Warning: Parameter 2 to wp_hide_post_Public::query_posts_join() expected to be a reference, value given in /home/yirese5/public_html/wp-includes/class-wp-hook.php on line 287


Hi Yi,
Watched your excellent video and want to try making your milk bread. I noticed you used a glass loaf pan and also placed it on what looks like a bread stone? Will the milk bread come out differently if I don’t have a glass loaf pan (mine is ceramic) and have no bread stone? Thank you.
Hi! I’m wondering if this recipe could be adapted to make a brioche-style loaf by putting a spread like chocolate or red bean in, rolling, then braiding? Would that change any of the proofing time? Also do you have any advice for kneading by hand? Your recipe says kneading by hand before adding butter only takes 2-3 minutes, but it usually takes be at least 20 minutes for it to not stick to my hands.
Hi! I’m wondering if this recipe could be adapted to make a brioche-style loaf by putting a spread like chocolate or red bean in, rolling, then braiding? Would that change any of the proofing time? Also do you have any advice for kneading by hand? Your recipe says kneading by hand before adding butter only takes 2-3 minutes, but it usually takes be at least 20 minutes for it to not stick to my hands.
Hi there! I know you use your milk bread recipe in your Pineapple Bun recipe as well. It looks like that recipe uses the previous stand mixer one. Just wondering if you would recommend using the original stand mixer recipe for Pineapple Buns or this updated one?
Also, would it be okay for me to use this hand mixed recipe with my stand mixer or should I stick with the old recipe?
Thanks so much!!
Hi Cat, please use the hand knead recipe. It’s a slightly updated version compared to the original stand mixer / bread machine version. Happy baking!
Hi Yi,
Thank you for this recipe! I made it twice and it was amazingly soft and fluffy as you had described! I used the stand mixer version and noticed you tweaked some of your measurements as well as baking temp and times for the hand mix version. What parts should I update in the stand mixer recipe if I plan on continuing to use my stand mixer?
How long & what temp did you sous vide that egg for?
Thanks!
Tiff
Hi Tiff, thanks for checking out my recipe. I’d keep the stand mixer recipe the same as the hand knead one. The hand knead one is what I considered the slightly improved version. As for the egg, I generally use 145F / 63c setting on my immersion cooker. Hope this helps.
Was wondering if you had the recipe in chinese?
hi there, sorry i don’t have it in Chinese.
Hi! This was my first attempt baking bread but my loaf had a few air bubbles at the front. I’m pretty sure I made every effort to get the air out in the steps but do you have any other suggestions?
Thanks!
hi Olivia, air bubbles are unfortunately unavoidable sometimes even you try to remove all of them when rolling the dough. I have observed that if you let the dough raise in lower temperature for longer it generally creates fewer bubbles. My bread comes out better looking in the winter time than that of summer time. Hope this helps a little bit.
Hi Yi!
I made this bread twice so far and it’s come out perfectly! The bread is soft and fluffy and subtly sweet, just like you promised. Thank you for your clear instructions and step-by-step video – it helped a lot in my understanding 🙂 This’ll definitely be my go-to recipe for milk bread especially since I don’t have a stand mixer!
hi Carissa, thank you so much for your feedback and glad that you love the recipe! Hope you get to try some of other recipes here as well.
Hi Yi,
What are the dimensions of your loaf pan? Planning to make it tomorrow. 🙂
Hi Andy, the loaf pan is measured 9″x5″x3″ (width x depth x height). It’s a good old 1.5qt Pyrex pan. Hope this helps and happy baking!
Hi there! I’ve made this bread several times now and it’s a complete hit!
One question though: Every time I’ve made this, I try a different way of slicing it, but the bread is so soft, I struggle to cut even slices with my bread knife. How do you recommend I go about slicing the loaf? I always wait an hour after cooling to slice.
hi Walter, thanks for following my recipe. For this particular bread i don’t use a bread knife as it’s really designed for bread with a harder crust. If i had to slice the bread thin, i’ll first let it cool completely and then use a sharp chef’s knife which works relatively better. Hope this helps.
Hello Yi,
Thanks for this great video. My son wants me to turn this recipe into hamburger buns. I’ve looked at many recipes and I feel yours is best. I have made bread and English Muffins before so I think I can make this.
Besides doing an excellent job for us on the bread recipe I’m amazed at the expert work on that soft boiled egg finish in the video. Nice!!! How did you do that? You nailed it! I know my son would love an egg done perfectly like that Milk bread too.
I haven’t gotten to look at your website yet to see if you did one on the soft boiled egg but I’m hoping I’ll find it. If not then please consider sharing it. Thank you very much!
hi Maureen, thanks for checking out my brad recipe. I hope you get to turn the dough into lovely burger buns. With regard to the eggs, I used a sous vide precision cooker so it was pretty easy – just set the temperature and let them cook. If you have one of the newer instant pots you should be able to do it too. Hope this helps.
Hi Yi I cannot seem to locate this Hokkaido milk bread using hand mixer method. Can u pls help share the link to video? Thanks alot!! Hope u r well and healthy!
Hi Tiffany, hope you and your family are healthy as well! I didn’t post a video for the stand mixer method but you can find the written recipe here. Hope this answers your question.
After a long time trying other recipes, I still come back here to yours. Yours is still the best, you are the best kept secret in the internet world for me, even for your Chinese recipes here in your site. God bless you more and continue to protect you!
Hi Mary, thanks for your kind words. I hope you and your family stay safe and healthy as well.
I’ve made this bread twice now. The instructions are excellent. Thank you!
glad that you enjoy this bread 🙂
Hi Yi,
After recently seeing a recipe in high profile foodie magazine (which seemingly forgot to list the “milk” component of milk bread!!) I decided to search for a real recipe. I found your video and it was so well done, that you compelled me to give it a try.
This bread was amazing and totally worth the effort! Your instructions were perfect and easy to follow.
Thank you for this new addiction!
thank you for your kind words and really glad that you enjoyed the recipe!
Hi
To reduce the time kneading, I would suggest letting the dough rest 30 to 60 minutes before adding the fat, allowing autolysing. This works quite well for me.
thanks for the tips Carol. will try that next time.
I made this today and it was wonderful. I just followed along with the youtube video
thank you Emily.
I am going to try this for sure… but do have a question… when you save a golf size ball for next time… what do you do with that golf size ball? like how are you to incorporate to the next batch? how about the Tang Zhong? do i still need to make more Tang Zhong? or that golfsize ball will replace the original Tang Zhong?
This is the first time i am trying to make bread with Tang Zhong, i am excited!!!
Hello Dorthy, sorry for getting back to you late. The reserved dough improves the texture and flavor of the bread. If this is your first time making it, you can simply skip it. But if you plan on making this recipe often, I suggest you saving a small portion of the dough for next time (just wrap well and keep in the fridge). Tang Zhong is definitely recommended everytime you make this bread if you want to have it really soft. Hope this helps.
Hi Yi.
question.
the roux if made with preferred liquid milk suggests you add batches of flour when instructions read teaspoons.
i am making it
by hand and this doesn’t make sense.
thank you.
also my dough cracked on last rising. still going to make this and appreciate your video. will send you a photo but not sure what a hashtag address is. how about a general email? thanks leah
Hi Lead, thanks for checking out the recipe. I assume that you were referring to the ingredient list for the roux. So basically, you’ll need 20g of flour which is roughly equivalent to 2tbsp + 1tsp. The amount after slash is just a unit conversation of the 20g. The instructions for making the roux is still the same (and I don’t believe the instructions mention anyting about teaspoons, it’s only mentioned in the ingredients list). Hope this is clear now. Thanks.
First attempt think din proof enuff came out kinda dense..2nd attempt a success! Soft and fluffy! Btw the amount of milk and flour for the tangzhong only yield about 85g. So I made another small batch using half of the ingredients (50ml milk + 10g flour) to make up the 110g needed 🙂
hi Evan, thanks for your feedback and glad to hear that the bread came out soft and fluffy after just two attempts!! Good job!
Hello! Can’t wait to try this recipe out. In the list you indicated 1/3cup milk + 2tbsp milk but in the video you mentioned 2/3cup milk instead. Which one should i follow? Btw will it hurt if i add 2Tbsp of milk powder?
Hai!
I was wondering. What type of tablespoon do you use? The US one or the british one? Thank you! 🙂
hi there, the recipe calls for US tablespoon measurement. Thanks.
Hi! Which measurements that should I use? The weight and volume or the tbsp one? Because here in Indonesia, I found that the tbsp measurements is not the same with other country. Btw great video! Thanks before!
Hello Florensia, thanks for checking out the recipe. I personally prefer the weight/vol measurements as they are more accurate. Hope this helps.
Hi Yi!
I just tried this bread and it tasted really good. However, it came out small for my loaf tin and also rather dense. I followed the measurements for the ingredients and the rise times as well. The only thing I omitted was the starter dough as I did not have any. Was wondering if you could advise on what could be improved? Thank you!
hi Liam, thanks for checking out the recipe. To answer your question, a denser texture is normally caused by either not enough kneading or not enough proofing. If you kneaded the dough until you could stretch without breaking then it sounds like the problem was with proofing time. Was the dough almost double in size when you did the final proof? If not that could be where the problem is. Hope this helps.
I HAVE MADE THE BREAD 2 TIMES. IT DID NOT RISE ENOUGH. I BOUGHT NEW YEAST AND TRIED AGAIN. I AM NOT GETTING IT LIGHT AND FLUFFY. PLEASE TELL ME WHAT I AM DOING WRONG. HELP! PEGGY
Hi Peggy, if yeast is not a problem, I’d let the dough rise a bit longer. It’s possible that your room temperature is on the lower side. If that still doesn’t work, please try using a little bit more yeast. Hope the next loaf comes out awesome!
Thank you for this recipe! I tried it and it was delicious and so soft! Just a question though. Have you tried making steamed buns out of this recipe? Reason I’m asking is that I won’t have access to an oven let a lone a toaster oven in the next place I live, however, I will be able to get a steamer pot. So I was wondering how these buns turn out when steamed.
Hi Pris, sorry for not getting back to you sooner. I actually have not made any steamed buns with this recipe but I think it should turn out pretty good. On the other hand, I do have a regular Chinese steamed bun recipe if you are interested.
Hello! This bread looks excellent and I will defenetly try it, the Colombian bread is similar and I miss it very much here in The Netherlands. I do have a question, for the 1st time, can I omit the piece of previous dough? Of course I don’t have it, how can I replace it? It will change the texture of the bread? How can I mimic that small ball?
Thank you for your comment and help. The videos are great!
Hi Glaudia, sorry for getting back to you late. If you are making this for the first time, you can just skip the reserved dough. The bread with reserved dough generally has better texture but it’s not a night and day difference. If you really want, you can make a tiny batch of dough using just flour, water/milk, yeast. Let it proof until doubled the size, then add that to the main dough. Hope this helps.
Thanks for the posting. Going to try it. Will all purpose flour work for this recipe ? Many thanks.
Thanks Stefano. All purpose will work but since it has less gluten, the bread will come out slightly less structured when all else equal. Hope this helps.
Thank you so much. It came our very dense. Will try it again. 🙂
Thanks. Please don’t hesitate to let me know if you have any other questions.
Hi! I made this last week and ran into problems with the flour. I usually bake by weight, however the bread flour here in Switzerland weighs just 120g per cup -forgot about that and remembered when it was so dry! So I had more flour and had to adjust with more milk. It also came out so huge in my pan! And I never got to windowpane stage despite kneading on my KitchenAid for around 40minutes already! But it was still good and made incredible French Toast! Will attempt it again this week with less flour and will update you with my results.
Also, only 2 grams of instant yeast? I used 4 grams based on the7 gram packet saying it was good for 500 grams of flour.
Thanks!
I’ve tried several milk bread recipes, and this is the best I’ve found. The only issue I have is that it takes hours to make.
I’d like to make the dough on one day, store it in the refrigerator, then bake it the next day. How can I make it over a two day period?
Hi Gordon, yes you can stretch this recipe overnight. What I do sometimes is I follow all the steps up until the second proof (so the dough is shaped and placed in the baking pan). I then leave the dough and pan in the fridge overnight, covered. Next day, I bring the dough back to room temperature (takes 1-2 hours) then bake it as per the recipe. Hope this helps.
Hi! Just made the tangzhong and excited to start. Happy that the cream is out of the ingredient list as I also don’t have it on hand most of the time.
Question on the dough set aside. For next time, should I let it come to room temperature (shouldn’t take long as it is tiny) or can I use it directly from the fridge?
Thanks!
Hi there, thanks for trying the bread recipe. To answer your question, you can use the reserved dough straight out of the fridge. It’s so small that it doesn’t impact your proof time. Hope this helps 🙂
Hi Yi, I definitely love your recipes, i want to give this recipe a try but I don’t have loaf bread pan, can i make an individual portion like buns from this recipe? how long should i baked? Thanks!
Hi there, yes you can shape the dough into individual buns. I’d follow the same baking procedure but reduce the baking time by 5 mins. Hope this helps.
Hi Yi, I was wondering why the oven temperature and bake times are different in the two version of this milk bread? This one said to put the oven at 375° At the beginning the turn it down to 350° and the original one just said 350°
Hi Deb, this version gives a slightly more browning (because the higher temperature in the beginning). In terms of texture and flavor there is no real difference. Hope this helps.
Hi Yi, I made your bread twice in the last couple weeks and it turned out amazing, I have a question tho, Why do you roll it out a second time after you already made it into the logs? I eliminated this step because of time constants and the bread still turned out great!
Hi Deb, I think by doing it twice you increase the layers and the structure which lead to a fluffier texture. You’d still get pretty results without the second roll but it helps to create more pillowy texture. Hope this answers your question.
HiYi, I love the milk bread recipe!! But for buns, the pineapple bread recipe isn’t exactly the same. For Easter buns can i add currants to the milk bread recipe if I plump them? And add different spices? I really want the dough texture, it’s perfect.
Hi Jan, you can totally add currants or other spices to the dough to create your own flavor. I even made a load of delicious cheese bread with this dough recipe. Hope to hear how the Easter buns turned out!
Hi!! I would like to make stuffed cheese buns with this recipe! May i know at which stage should i fold in the cheese? Thank you!
Hi Weii, my suggestion would be to stuff the cheese after you shape the proofed dough into individual balls. Please check out this pineapple bun recipe for inspiration.
Hi, I just made this and it turned out beautifully ! I just started baking bread this week and have been trying out different bread recipes everyday and by far, this is the best , soft and fluffy! I have been sharing your recipe with all my friends . Btw I used active dry yeast and mixed it with the half a cup warm milk, as i didn’t have instant yeast. Thanks again for sharing, and next one I m going to try the pineapple bun!
Hello Fong, thanks for the feedback and sharing the recipe with your friends. That means a lot to me. I’m glad to hear that you figured out a workaround to use the instant yeast. Please let me know how the pineapple buns turned out!
Hi, Yi,
LOVE LOVE LOVE this recipe, I almost gave up baking bread at home, I just though that home oven is not able to produce bakery grade bread, I made 3 loaf of bread since yesterday, they are all good, and they stay soft as you promise. Thanks you so much for sharing.
I do have question though, on your ingredient list, 3g / 1/2tsp salt and 2g / 1tsp instant yeast 3 loaf, why 3g of salt is 1/2 tsp. but 2g of instant yeast is 1 tsp, is it because salt weight heavier than yeast?
Hi Vita, thanks for checking out my recipe. I too, until a few years ago didn’t believe that homemade bread could be this soft and fluffy (without using any additives) but this bread definitely changed my view on baking.
Anyway the reason the weight is different is due to density (I think). I normally go by gram as it’s more accurate. The tsp listed is obtained by converting the ingredients on my kitchen scale. In any case if you are unsure, just use the gram measurement. Thanks again for the feedback!
Hello. Love this bread. I do it in my bread machine on the dough cycle. It makes the best cinnamon raisin bread. I will try saving a piece of dough for my next lisf. At what point in the bread machine cycle would i add this piece of old dough. I have picture of my first loaf if you would like to see it. Sandy
Hi Sandra, thanks for the feedback. I think the bread machine works perfectly for this recipe. I used to use my bread machine all the time until it die sometime ago :(.
Yes I’d love to see your pictures. Please send it to yi(at)yireservation(dot)com or share with me on facebook page. I am going to make a collage of all the bread pictures from my readers 🙂
Hi Yi,
How can I make small buns for Easter using this milk bread recipe?
Many thanks, Jan
Hi Jan, I’d like to point you to this pineapple bun recipe I shared before. It goes over the process of making a specialty Chinese bun using the same dough but you can just skip the topping part and shape the bun/roll as indicated. You scale the size of the roll according to your own preference. Hope this helps.
OMG!! i just finished baking it, doubled the recipe, followed it to a T, its the most amazing bread i tasted- no kidding! i was screaming around the house saying “I finally can bake a bread and its the best bread ever!”, thank you soooo much!!!!! i have photos, how can i post them?
Thank you for your kind words. So happy to hear that your bread came out nicely! Please tag your pictures to @yireservation on your social media or email them to yi(at)yireservation(dot)com
Hi Yi, I made your recipe today and I must say it is a wanderful bread so fluffy moist and flavorful. My family appreciated a lot and I just saved 1/3 for tomorrow in a plastic bag , I am sure will be perfect also toasted. As I do recently I made stretch& folding as soon as I finished to incorporate the butter , every 5 minutes 3 times only so it takes 15 or 20 minutes then I leave to rest for the first rising. All the rest is the same of your recipe. During each rest time I clean around so every thing is so easy for me ( most of the time I work on a parchement paper avoiding mess). Many greetings and thanks.
Thanks Anna for the feedback. I am glad that you and your family like the bread. Will try the stretch and fold method next time I make this bread.
Excuse memy phone do not work well .
Hi Yi, how nice to see you.Many thanks for the handmade recipe, I just was in search of it . . . I will try for sure. Have you tried the stretch & fold method for it? May be it is time saand work saving I’ll let you know. Have joy and health for New Year 2017 and best regards.
Happy New Year Anna. I’ll check out the stretch and fold method. I’d try anything that can save me time and effort 🙂 thanks for sharing!
Hi Yi. How nice to see you. What a good idea the handmade recipe, I just was in search of it.many thanks. Best wishes for the New Year 2017 have joy and health.
You forgot the butter in the ingredient list. 🙂
Hi Nicole, thanks for spotting it. I just updated the ingredient list!
Wow, what a fascinating recipe! I had no idea so much elaborate care and effort went into this kind of bread. As someone coming from a totally different culinary tradition, where bread is made to be crusty on the outside with a firm, structured crumb, this is a real revelation.
I am a huge fan of Italian bread and like to serve with good olive oil or make bruschetta out of it. It’s hard to compare the Italian rustic bread to this Asian milk bread because the latter is more of breakfast or snack bread although I’ve served it for dinner with butter and got really good compliment 🙂
This bread looks so soft and easy to make. Definitely going to give it a go and spread with some homemade strawberry jam.
Yi, your bread turned out great…tangzhong is my favorite method for baking bread…always, soft and tender.
Hope you are having a wonderful week 🙂
Thanks Juliana. Glad to hear that you also use tangzhong method to make bread. Have a great weekend!
I enjoy making bread but haven’t tried Milk Bread yet. Your instructions are straightforward and the and results are spectacular! A must try recipe!
Thanks Deb. Please let me know how you like this soft milk break if you get to try it.
I like using instant yeast too. I usually have some in my freezer, where it will keep for years. Anyway, what a nice bread! Always fun to come back and revisit an old recipe, and change things up. BTW, I’m taking the rest of the year off, so I’d like to wish you a happy holiday season!
Happy holidays to you too John!
Hello Yi. Your bread really looks fluffy and soft. I would like to try it, even though it a bit time consuming to make it. However, I still have one question. You are using some rest dough. What if I do not have any rest dough?
Should it be substitued with something? I really enjoy your recipes. Keep up the great work. Greetings Sonja
Hi Sonja, thanks for checking out this bread recipe. If you don’t have any leftover bread dough, you can skip it this time. The bread is still going to come out awesome but with that left dough it just tastes more “flavorful”! Hope this helps.
Big chef, this is excellent and very nice video. Love it!!
Hi Pei, thank you for your kind words.
Hi Yi, I love your recipes and I love to make bread and want to try this one that you just posted. But I need a translation of the European measurements of Gm’s and gr’s into American style of ounces or cups. Can you help? Many thanks, Jan
Hi Janet, thanks for being interested in making this bread. I just updated the recipe to include the US units. However I do have to mention that the U.S. measurement is based on my approximation and there will be some variation when it comes to flour weight. Please refer to the pictures or video for verification. Please let me know if you have any other questions.
This is *so* labor intensive! Yet I’m tempted to try.
You really can’t find this at like Chinatown in NY? They often have those soft bread in the bakeries. I mean, hand-made is certainly going to be the best, but I can’t imagine they don’t have these in Chinatown.
hi Coralie, this is definitely labor of love. I know Chinese bakeries sell Asian style white bread/milk bread but the quality is not quite good. The best store-bought milk bread I’ve had here in the States is from a Japanese grocery store in NJ but it’s definitely a trip to get there from where I live.